Category Archives: What Makes It Tick

WHAT MAKES IT TICK: STAR WARS X-WING PART VI

Seeing as the last article triggered no less than 19 E-mails with questions and comments regarding ordinance I thought I would ride the momentum and write another one addressing one of the questions most of these e-mail more or less implied. Keeping in mind I’m no master or final authority on the topic, here goes nothing.

Question
Is there any ordinance that is a notch above the rest or better in some way? Something that might not be labeled as “useless” or “not worth it”?

Answer
In my personal opinion I actually think most ordinance is quite a big notch above primary weapons. I think the thing about ordinance is that you typically have to make an ordinance list and create synergy to gain the full value of ordinance and it’s in this element costs mount and you really have to weigh lists against the alternatives. You definitely can’t simply splash ordinance into a list in most cases. You are effectively creating a list built around a strategy driven by the type of ordinance you have selected. I have also noticed that many people miss-read and miss use ordinance, often skipping over a critical element of a piece of ordinance, something I have often been guilty of myself. I think perhaps a more specific breakdown could be helpful. My point however is that I don’t actually believe ordinance is bad, though I do agree that it requires a lot of scrutiny and there are quite a few limitations and “on the fence” points where you really have to consider value vs. alternative.


Torpedo’s
TorpsTorpedo’s were effectively the first ordinance introduced into X-Wing in the original core set. Torpedoes typically require you to spend your target lock, so they put you in a position where you might be rolling dice without a focus token which is typically bad. It’s especially bad for one shot items that cost between 2 to 6 points. When it comes to torpedoes as ordinance you are pretty much always looking to create synergy effects to help ensure that when you shoot you get your points worth in damage caused. This is why early ships like Garven Dreis and Dutch Vander where such a great combo for using torpedoes. The question is are they worth it, well, yeah, I think they are.

dutch grave

In this synergy combo Dutch Vander target locks, which in turn gives Garven Dreis a target lock and vice versus Garven Dreis takes a focus action, so when he shoots his torpedo, spends his focus, he immediately gives it to Dutch Vander who in turn does the same thing (shoots torpedoes with focus). Effectively allowing you to Target Lock, shoot torpedos with a focus all in the same round for both ships. Both ships are 6 pilot skill which ensures you can use them interchangeably. A really great combo and example of how synergy combined with ordinance can be very effective. The problem? You have selected 50 points worth of ships around synergy designed for a single torpedo shot from each ship. Once you shoot it your left with a base X-Wing and base Y-Wing unless you dump more points into them. This is where great combos like this really lose their luster, it is a great combo but you have to question its value when compared to alternative ways to spend 50 points and the plethora of ways you can create synergy between ships.

A sound rule for creating synergy based on ordinance delivery is to ensure that the synergy continues after the ordinance has been spent.

That said I think the reputation of Ordinance being “not worth it” stems from Torpedos specifically because of the core mechanical problem with them. You must spend your target lock and they are one shot effects. Aside from the one shot thing unless you target lock one round and shoot the next, you will be doing it without a focus unless you find a combo like the one shown above to alleviate that issue. I agree that this is an issue with torpedoes specifically (not necessarily ordinance in general). It is valid to say that if you are going to shoot a torpedo without a focus, in most cases your better off shooting your primary weapon with a focus even if you are rolling less dice instead.

Let’s look at how some of these torpedoes can impact a match.

Proton Torpedoes for example allow you change 1 of your focus into a crit. While the crit is nice, when you roll 3 red dice with a focus using your primary weapon your odds are not really much improved by rolling 4 dice without one. This is typical of shooting ordinance without a focus. That said however you do flip one focus to a crit and most importantly you can shoot at range 3 without your opponent getting an extra agility with 4 dice. That is the benefit here and it’s a pretty big one because in the opening round of a match you will be at range 3 in almost all cases for at least one round on the approach. A couple of even moderate Proton Torpedo hits against an opposing fleet in the early stages of a match may be all you need to soften up your opponent and domino yourself into a victory. I do think it’s a bit pricey at 4 points, but If you use Proton Torpedoes make sure that by round 2 they have all been fired at range 3. This is there secret, 4 dice, range 3 no agility bonus for targets. If you do it with a focus, you are practically assured of some successful hits.

Advanced Proton Torpedoes are probably the trickiest if not most difficult ordinance to use in the game next to bombs, but they can be made to effectively guarantee 5 hits. You have to be at range one, you have to spend your target lock and the only benefit of its special effect is to flip blanks into focuses (3 of them), which, If you don’t have a focus makes the special ability useless. Now you do roll 5 dice which can be devastating. The assumption here is that you target lock on the approach and focus on the round you have someone in your sights at range one. With a focus you are 100% guaranteed 3 hits and extremely likely to get all 5. It’s not always an easy task to get into range one and get someone in your arc, especially for ships that can fire torpedoes since they tend to be less maneuverable and far easier to arch dodge. At 6 points it’s among the most expensive gear cards in the game as well.

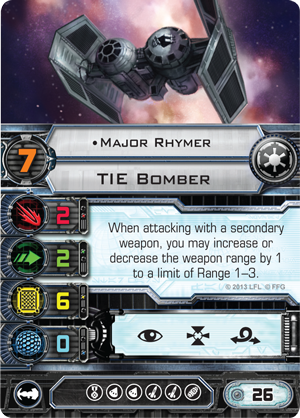
Again this comes down to combos and building synergy is all about reducing or eliminating the core problem created by the base gear in the case of Advanced Torpedoes especially. In this case its arc dodging, easily solved by Nera Dantels for example who doesn’t cares about arcs when shooting ordinance. Another fine ship for shooting short range torpedoes is Major Rhymer, same cost, he increases your range to a 1 to 2 making it much easier in particular for the dial friendly Tie-Bomber. Just a couple of combination in which this little piece of ordinance can be used to greater effect.

Even with its ability to shoot in a 360 degree arc you have to question the wisdom of using a B-Wing as a ordinance delivery system, especially considering the cost.
Is it worth it?.

We are back to the question is it worth it. Well I can say without hesitation that getting a 5 point hit on an opponent for 6 points is well worth it, always, especially if you choose your targets wisely. Since both ships have torpedo slots you can use Extra Munitions to turn 12 points of gear into 8 points of gear to potentially get two 5 dice shots. Not bad at all in my opinion.

Fletchette Torpedoes are also an interesting piece of gear because it’s so cheap and because its effect is guaranteed. Many people miss that there is no requirement to successfully hit to cause stress with Fletchette torpedoes, you simply need to fire it, so it guarantees that a ship with 4 hull or less will receive a stress as a result regardless if you get additional damage. If timed right this can be devastating and really Fletchette torpedoes are a reactive piece of equipment and one of the few that you can splash thanks to its low 2 point cost. You use it when the time is right, when giving your opponent a stress can cause critical problems. In X-Wing such opportunities happen quite frequently, in fact, it’s kind of a rare case when having a stress doesn’t cause you problems. For 2 points it’s a dirt cheap piece of gear to drop on rebel fleets in particular who have some many ships capable of firing torpedoes. I believe it to be one of the most cost effective torpedoes in the game when you understand how to leverage the impact a single unexpected stress can have on an opponent.

Now that’s not all of the torpedoes and perhaps I will do more articles talking about them in the future but suffice to say the reputation for ordinance being useless even when measured against Torpedoes is debatable at best. Missiles on the other hand, their reputation as useless is not deserved at all in my opinion. I will concede that missiles, like torpedoes require synergy and often very specific list building combos to be effective but missiles can be used to devastating effect and it doesn’t take much to make it so.

Missiles
The thing about missiles in my opinion is that almost every specific missile has a specific ship and in some cases, pilot that it’s really fantastic with. For the rest they may be so so or just plain bad, but that’s really the case with any equipment card. That might explain the reputation again here of ordinance being not worth it, but put the right missiles on the right ship and you can produce combos that are crazy game changers.

Cluster Missiles. The fact that you get to shoot twice in one round is already a substantial advantage to this equipment which I think is pretty good for almost every missile capable ship that mounts it. Cluster missiles however are fantastic on the Tie Bomber for several reasons.

Part of the reason is cost. 2 Cluster missiles with 1 extra munition on a low end (Scimitar Squadron) Tie-Bomber means that your Tie Bomber can potentially shoot 8 times in 4 rounds for a combined total price of 26 points. That is dirt cheap! Now grant it you have the “spend target lock” issue but there are a number of ways to address that from Squad Leader, Howlrunner or simply upgrading one of the ships to a Captain Jonas.

Proton Rockets. God I love the proton rockets. First and foremost you don’t need to target lock nor do you spend your target lock when using them which means when you shoot them you always shoot with at least a re-roll. Now there core ability is to increase their firepower when placed on high agility ships making it capable of getting it up to 5 dice. 5 dice if you can combo it to get a focus is … devastating even if you shoot it only once. Where do you put it?

The maneuverable and flexible A-Wings are the obvious and best choice, it goes without saying. It in particular works with an Airen Cracken with squad leader (great way to support ordinance ships in general). Perhaps less obvious is putting it on a Z-95. Sure you’re only up to 4 dice, but a bandit with proton rockets is 15 points. For all the complaints that ordinance is too expensive, that is dirt cheap and you can easily fit 4 Z’s in this fashion for 60 points and still have 40 points to play with.

On the Imperial side you really don’t have a good spot for them at the moment unfortunately. There is the Tie-Defender, which is already a bit too pricey in my opinion to mount missiles on it. The Tie-Advanced could do it, but it has the same issue as the defender, its already a bit pricey as is.

Tie Bombers can be fitted with them cheaply enough, but getting a Tie-Bomber into range 1 and in arc requires some doing and you may as well spend the extra points on a more powerful range one weapon if you are going to try it. In general though there is other ordinance that is fantastic for the Tie-Bomber for the same price.

The final one I will talk about is Homing Missiles. For 5 points you have a 2-3 range ordinance with 4 dice that does not require you to spend a target lock and prevents the use of evade tokens. This is a fantastic missile that works on almost every ship. One of the toughest things to do is to get a bead on high agility ships with evade and homing missiles are a great response. When you shoot a homing missile at range 3 you deny your opponent the bonus agility on top of everything.

Homing missiles have some really great synergy ships that they work particularly well on. Take for example the Z-95 combo of Airen Cracken with squad leader and 2 bandit pilots. You target lock with all 3 ships, then shoot with Airen Cracken in turn giving the other 2 ships 1 focus token each. Now you are shooting 3 Homing missiles, 1 with a target lock you can spend for re-rolls and the other 2 with focus and target lock re-rolls. That 12 dice with a high probability of hits and if you do this at range 3 you are not only denying evade tokens but the bonus for range to agility.

Grant it this is a 60 point combo but these ships continue to have great synergy after their ordinance is fired which is one of the rules you want to govern your ordinance/ship synergy selection.

Is it worth it. Well its debatable whether spending 60 points on Z-95’s is worth it, but if you get the hits early on this combo can really domino a match.

In conclusion. Well it’s hard to come to a conclusion. Ordinance is very expensive and being a one shot weapon requiring synergy to be effective even as a one shot weapon makes this the always questionable choice. There are a lot of great combo’s and lists one can build, it becomes tough to justify ordinance but in the same token I hope I have shown that its hardly “useless” as its often implied to be. There is a lot of potential to create complete havoc against your opponents with ordinance so unless you are an ultra-hardcore competitive player they are certainly viable. In competitive play I still agree with the general consensus that ordinance has yet to find a place in the meta, but in the same token the competitive meta excludes a great deal of things in X-Wing, excluding far more than it includes. To measure ordinance against competitive play is not really reasonable in your house games and it’s in house games the majority of X-Wing games take place.

I hope you found this article helpful and keep those questions coming, I’m always happy to have some fodder for more articles.

What Makes It Tick: Star Wars X-Wing Part V

It’s been a while since I have written an article for this series but I have received a number of E-mails from what I have gathered are new x-wing players requesting more and since I don’t actually usually get requests I thought I would fulfill the ones I do have. I thought about what topics I wanted to breach and decided to talk about the frequently disputed elements of ordinance and ordinance based ships. Typically ordinance is an element of the game often labeled “not worth the cost”, a sort of standard mantra at least in the competitive and online conversations about them. Today we will get into some details about the problems with ordinance and ordinance based ships and some hopefully clever tips on how you can leverage them to your advantage.

Ordinance
Torpedoes, Missiles, bombs and the ships that use them are often seen as risky propositions in list building, in fact in the competitive scene you will rarely see ships fielding ordinance and ships like the Tie-Bomber are also very infrequently if ever used in competition. The reason is quite sound. Ordinance weapons are one shot use weapons and typically, for the cost, the effect or impact on the game is considered too small to justify it.  At least that’s the theory.

So what are the listed problems or complaints about Ordinance?

Spending targets lock to fire them is just one of several issues with ordinance. Or do you, look closer, not all ordinance requires you to spend your target lock or focus.

The main complaint for starters is that you have to spend your target lock and really in the case of most ordinances this is the problem.   As you can see above however this is not always the case, I point this out early because its a common oversight.  You often only get one action so target locking someone which with primary weapons is used to trigger re-rolls is spent instead just to use the attack and rolling 3 or 4 red dice without a focus or target lock to improve odds means you are shooting at 50/50 odds. Even with various effects like getting two attacks, doing extra damage to nearby ships or triggering Ion effects there is a legitimate chance you will simply miss. By default hit or miss the ordinance is spent anyway. It’s like effectively shooting 3 to 5 points at a target. Consider the alternatives to spending 3-5 points on ordinance for something else like for example a push the limit (two actions – Focus and Target Lock) or Expose (increase primary weapon by 1), effects that can be potentially be used multiple times in a match. These effects increase your chances of getting more out of your primary weapons for the same price.  Its a valid complaint in my opinion.

Perhaps the most common use of the Tie-Bomber is the cheaper, Scimitar Squadron Pilot coming in at 16 points  Worth it until you see the dial.
Not terrible, but this is no doubt the least maneuverable of the Tie class ships.

There is also the issue of the ships that shoot the ordinance or at least are designed to do it well like the Tie-Bomber for example. The stats on these ships are generally fairly mediocre and you typically are going to need to put more than one piece of ordinance to make it formidable on the field. That of course increases the cost. More than that, if you really want to get some guarantees you have to use special gear to allow you to do that like Munitions Failsafe, Extra Munitions or combining it with other gear like Push the Limit so you could at least roll the dice with a focus or special pilots. All this amounts to increasing costs for a ship that when it runs out of ordinance (assuming it survives long enough to shoot it) is a lack luster performer without ordinance.

For the ships that fall somewhere in-between, ships not really designed for ordinance but have the option it’s even less worth it. Putting ordinance on an X, A or B wing increases the cost of a ship but typically these ships gain far more benefit from its primary weapons when combined with gear more specifically tailored for the ship. Your far better off with an advanced sensor on a B-Wing than you are putting torpedoes on it. Again because you will be able to use advanced sensors throughout the match, while the ordinance is a one trick, one shot pony, the value is fairly easy to determine. You could of course do both but the costs mount and you really have to question the value of things like proton torpedoes where you can roll 4 dice at 50/50 odds one time during the match or rolling 3 dice with a focus (or 4 dice if you are close range) every time you shoot.

Even with its ability to shoot in a 360 degree arc you have to question the wisdom of using a B-Wing as a ordinance delivery system, especially considering the cost.

Some might argue that ordinance is all about player skill, if you are good, the impact of having ordinance at the table can be devastating and that to a degree is true, but X-Wing is not just a game of a skill, it’s a game of dice and when it comes to ordinance bad luck with the dice is going to have far more impact on you than it would if you were firing your primary weapons. Besides in the end, the argument that it’s “not worth it”, is a direct reference to point cost. Simply put the cost of mounting ordinance on a ship is going to weigh in at around 10-20 points extra and that is practically a whole extra ship which means that in order to get the value from the ordinance you really need to be able to do the work of 2 ships with your ordinance ship, that’s a tall order! That ordinance, no matter how good you are, simply cannot do it.

Now with that said is there any circumstance in which it is worth it? I believe the answer is yes. Getting value out of ordinance is all about understand how you can leverage ordinance ships not against cost, but against strategical possibilities within the structure of your list and tactics of the game. Another words, a Tie-Bomber with Cluster-Missiles and Extra Munitions might not be cost effective, but if combined with a good pilot card and some bonus gear your opponent will have to address that ship or suffer the consequences. The concept is what I like to call, “rat trapping”, which simply means that you have created an obvious and immediate threat, this Is your trap and your opponent is the rat. He will walk right into your trap because he will see your munitions ship as a major threat and as such if you build the rest of your list with your trap in mind, the combination can be devastating.

With that said, let’s look at an example list.

The Tie-Bomber is arguably the worst of the ordinance ships and so let’s see if can create a list using it as a base for our rat trap.

Major Rhymer 26 (Push The Limit 3, Advanced Proton Torpedoes 6, Extra Munitions 2).

The ability to increase range makes using Advanced Torpedoes more viable for this Tie-Bomber that is unlikely to ever get someone in their arc at range 1 given its dial.

You might immediately see how dangerous and expensive this ship is. At 37 points its death on wheels for at least 2 rounds. You have push the limit to assure you can target lock and focus, you have advanced Proton Torpedoes that can fire at range 1-2 that combined with a focus all but assures you are going to get 5 hits (3 blanks turn to focus, you need only to roll 2 hits with a focus at about 75% odds). Extra munitions that turns a 6 point piece of gear into a 2 point piece of gear.

Now this is a vulnerable ship but there is no question that your opponent will do everything in his power to eliminate it early, he will see this ship as a major threat and rightfully so because it is. If allowed to shoot, it’s going to earn its weight in points. He is your trap and you want to leverage your trap by creating the rest of your list knowing what he is going to go for.

1 x Tie Phantom (Sigma Squadron) 25 + Fire Control System
3x Tie Fighter (Academy Pilot) 36

Most people go for the expensive Phantoms, but the Sigma Squadron Pilot at 25 points is dirt cheap for a ship that can cloak and rolls 4 dice even at long range. Especially when you consider its dial.
Consider the Interceptor dial, a ship widely accepted as being incredibly maneuverable.
The Phantom is pretty comparable to the Interceptor. The only real trade up is boost for cloak. Make no mistake its an arc dodger with fire-power.

All you need to do is position these ships (your core squad) away from Rhymer to ensure that anyone going for him, is going to have to turn their back to the rest of your ships. With some good piloting and careful use of the Tie Phantom and at least one clean shot with Rhymer you should be able to gain an early advantage against most lists.

Now tactically you have many options with this list. Once Rhymer uses his ordinance, he is your blocker. Crash him into stuff and make him a nuisance setting up shots for your other ships. If your opponent chases the phantom or the Tie-Fighter play the avoidance game, evade, cloak and bug out forcing him to waste shots and buying you time to get Rhymer into position. With Rhymer you want to target any low agility ships, or core support ships or big easy to hit ships. Make that those 2 (5 dice) shots count if your opponent doesn’t address Rhymer. Most importantly remember however that Rhymer is not your fleet, he is your distraction, he is the ship that will put your opponents ships out of position and into your trap.

Is this a good list? I suppose we could argue about it, but it does show how the Tie-Bomber and ordinance can in fact have its uses and while this list isn’t what one might call ultra- competitive, it does certainly have a lot more going for it than just reliance on ordinance. The ordinance in this list is really just a ruse if you will for getting the actual threat (1 Phantom and 3x Tie Fighters) into position. The hope is that your opponent will not realize that the munitions ship, that Tie-Bomber is not really the big threat.

The Conclusion
Ordinance is not terribly cost effective, in fact the argument that it’s “not worth it” certainly has some validity and I mostly agree with it. X-Wing list building and in general playing X-Wing is about creativity and fun for most of us, so if you simply step out of the competitive number crunching (Math-Wing) and think outside the box a little, ordinance presents an interesting challenge to players. Can you create a great list that works with ordinance, I believe the answer is yes. I have had success with the list above, not because it’s a great list but because it’s unusual enough that your opponent is stumped on how to address the challenge. Do you split your fleet, do you go for the Tie-Bomber or focus on the Tie-Phantom.

I think meta thinking is part of the reason ordinance has such a terrible reputation in the competitive circuit, in fact, I believe that if you took a list like this to a tournament you would probably do quite well simply because of meta thinking. When everyone is expecting one of three or four meta lists and they are facing something unusual, it throws chaos into the their tactical expectations and this your advantage. I personally love flying lists like this, the look on your opponents face is all the reward I need.

What Makes It Tick: Star Wars X-Wing Part IV

I debated a lot about writing an article about list building because it’s a subject difficult to breach as it is largely based on preference and is always highly debatable. Any list I put together can be argued for or against and as such, suggesting lists to players is almost kind of a politically incorrect idea. Still, when I was a new player I found I lost a lot of my matches not because of what I did during the game, but the mess I created before the game while building my list. I’m going to focus more on general list building advice, things to consider, things to avoid and a few general lists that you always have to consider when building your own.

Getting Started With List Building
Naturally, your ability to build solid lists is going to be limited to the collection you have, so realistically speaking until you have collected a fair amount of ships and associated cards that come with them, it’s going to be difficult to build lists that are going to be competitive against players with a wider selection. Being competitive however isn’t about building really strong lists, but more about avoiding building weak ones and building counters to strong ones. What I’m referring to here is the concept of “people use what works” and as such, most X-Wing players are kind of predictable and so what you will be facing can sort of be predicted.

There are going to be three types of list you always have to be ready for, these lists come in many different forms, but they pose kind of general strategies that you always have to consider when building your own lists.

The Swarm
The swarm is typically done in Imperial lists, though these days it’s possible to face rebel swarms as well. The jist of the swarm is a list with a lot of, weaker ships, that when combined can create pretty significant firepower. They are in essence lists that rely on the statistical truth that the more often you roll shooting dice, the more likely you are going to succeed.

While considering building lists to face Swarms, don't overlook the importance of good asteroid placement.  Swarm lists depend highly on staying in formation and asteroids make that difficult.
While considering building lists to face Swarms, don’t overlook the importance of good asteroid placement. Swarm lists depend highly on staying in formation and asteroids make that difficult.

A very common form of this list is the Tie Swarm and when building any list you always have to consider “how will my list deal with a Tie Swarm”.

You have to imagine facing 8 Tie Fighters, coming down the center of the table, singling out one target and focusing all their firepower on that one target. Strictly speaking, with 8 ships shooting at a single target you are facing a minimum of 16 dice, broken down into 8 rolls which will yield an average of 8 hits, but you can expect divergence where you could end up with 10+ hits. Very few ships in the game can stand up to that kind of firepower.

Preparing to deal with swarms via list building is difficult, but the one strategy that you must always assume that you may need to employ when facing them is splitting up your squadron. In essence you want to make sure that your list can split up and still be effective and this should always be considered when building any list. If your list is less effective when it splits up, you are going to have a problem against swarms, so always make this assertion about what may need to happen when building your lists.

The Big Guns or Alpha Strike Lists
There are many forms of big gun lists, but in general a big gun list is one which there is a ship or ships, that can produce a lot of dice and or high odds of rolling hits (via re-rolls etc..) in a single round. In essence these lists are made for simply focusing on a target and taking it down in one shot. Very often these lists are built on a 360 degree firing arc, either because of the ship (like the Falcon for example) or because of the gear used. It’s not always the case but the point of the list is to get a target in range and roll lots of dice and do big damage in one shot.

Many ships like the YT-1300 can be turned into pretty efficient alpha strikers and can shoot at 360 degree's.  Dealing with them is not easy, but alpha strikers are usually point heavy so taking them out efficient can often yield you a quick win.  It's often an all the eggs in one basket situation.
Many ships like the YT-1300 can be turned into pretty efficient alpha strikers and can shoot at 360 degree’s. Dealing with them is not easy, but alpha strikers are usually point heavy so taking them out efficiently can often yield you a quick win. It’s often an all the eggs in one basket situation.

You MUST always assume you will face Alpha Strikers. Dealing with lists like this must be assumed when you are building your own. How will your list deal with big Alpha Strikers. The solution for Alpha Strikers is all about having the means in your list to circumvent or reduce dice odds. You want to have something in your list that will throw a wrench into someone’s plan, a ship, effect or equipment that will reduce the effectiveness of a ship that can alpha strike.

Some examples of that are pilots like Biggs Darklighter, who forces ships to target him, allowing you to control who get’s shot (controlling the range) or having something like R2-D2 fixing his shields can buy you the necessary time to counter an alpha striker. Other ways is just using straight maneuverability, staying out of the fire arcs of Alpha strikers. Ionization is another method, controlling an Alpha Strikers movement can be very effective. Countering it with your own Alpha Striker is another method.

Point here is that you have to assume that you will be facing pilots with a high pilot skill that can do a ton of damage in a single round and have a plan on how you are going to deal with that situation when it comes up. Any list not able to deal with Alpha strikers is a weak one.

Maneuverability Lists
The final type of list you will certainly face are lists built around insane maneuverability. There are many incredibly maneuverable ships like Tie Interceptors, A-Wings, E-Wings and many more that can when combined with different types of equipment and specialized pilots produce unpredictable and impossibly agile ships that will stay out of your range and firing arcs at their leisure. You have to assume you will face such lists and have a plan for how to deal with them. Any list that assumes that ships will simply fly in front of you to shoot at them is certain to see a lot of losses.

Ships like the Tie Interceptor are extremely agile and can be difficult to keep in firing arcs, but they are just Tie-Fighters as far as dice statistics go, one clean shot can take out a 25+ point unit.  Expose that fragility by forcing them into vulnerable positions by splitting up your forces and covering multiple angles.
Ships like the Tie Interceptor are extremely agile and can be difficult to keep in firing arcs, but they are just Tie-Fighters as far as dice statistics go, one clean shot can take out a 25+ point unit. Expose that fragility by forcing them into vulnerable positions by splitting up your forces and covering multiple angles.

The trick to dealing with agile lists is understanding that in most cases, agile ships give something up for that agility. For example Interceptors are incredibly agile, but fairly weak with only 3 hull, catch them once and they are dead. A-Wings are very agile but don’t have much firepower, so that agility while keeping them safe doesn’t offer much in the way of firepower threat. E-wings are very agile and have a lot of firepower but are very costly even for what you get.

The end result is typically agile lists, will have fewer ships and or less firepower, it’s the agile lists akiles heel. To put it simply, agile lists are best dealt with through focus fire and disruption of their advantage either through 360 firing arcs, using your own agile ships or Ionization. In particular ionization spells doom for most agile ships and the nice thing is that ionization based ships are generally dirt cheap.

For the most part however agile lists need to be dealt with on the field, there are things you can do to your build, but typically any list is capable of handling maneuverable lists through strategic positioning on the field, but you must assume you will face such lists and have a plan.

How I build Lists
Given the advice above let me tell you how I build lists, which, I will admit right out of the game is simply my preference. I make no vows or promises of success, but I find when I fly lists that play on my strengths in the game, I do better even if the lists themselves are not terribly strong.

I work on lists using a three step process.

First, I choose a single ship around which my fleet will rally. This is usually the ship that creates synergy or is somehow important to the strategy of the list, the gimmick of the list if you will. For example using a Han Shoots first, or a Vader Doom Shuttle, a stealthy Phantom or a synergy based B-Wing. Whatever the case may be, the point here is, that this ship, is what will define the strategy of the list.

One of my favorite new modification for X-Wing.   There are some great combinations this card can be used with to base lists on.
One of my favorite new modification for X-Wing. There are some great combinations this card can be used with to base lists on.

I find this easier to do because once the ship (or concept if you will) is chosen, what else belongs in the list becomes very obvious. You start seeing the combinations and possibilities more clearly and the list practically builds itself. Without this I feel kind of lost and find it more difficult to sort of construct a force that works together.

The second thing I do is called “fat trimming”. This takes a bit of experience but I will give you an example.

Let’s say I want to add a ship to a list for an Ionization effect and I chose something like Horton Slam which allows me to re-roll blanks at range 2-3, a good ship to have when using Ionization effects. But he costs 25 points + equipment. I will pose the question, how important is it that I have a high pilot skill and the re-roll effect for this list? Can I get away with a Gold Squadron pilot for 18 points instead? This will of course depend on the type of list I’m building, but the idea is to really question the necessity of having more expensive pilots for certain goals of the list. Sometimes it’s vital, sometimes, it’s not. Trimming what is not is important because every point counts and you want that fleet as lean as you can get it. You can often end up with sufficient points to add a whole separate ship when trimming the fat and more importantly come up with more efficient squadrons. I do the same thing with equipment, I question the necessity and most importantly the value of equipment for a particular ship. I make sure that every piece of gear I have is something that is absolutely vital to the ship and strategy. If it’s not, it gets cut or replaced.

The third and final step is what I call the maneuverability test. Every list I make, must have a natural flow to maneuverability. I think about deployment and consider how these ships will enter the game, what position they will be in and try a few different configurations.

I find that by doing this I often find places where more cuts (trimming) can be done and sometimes where I have trimmed too much. Consider that pilot skill defines when ships will move, when mixing different pilot skills the result can be that certain ships must move too soon, while others move too late in the sequence that will be your turn. I want my fleet to move in a natural expected way on my turn and often I find that if the sequence of events aren’t efficient, there is an awkwardness to a squadron that makes it difficult to pull of a strategy.

For example let’s say I’m using a Firespray combined with interceptors and the Firespray has tactical jammers on him. If the interceptors move first, it can be difficult for me to guesstimate the position of where the firespray will end up on his move. As such, I might find that, while less effective combat wise, a lower pilot skill on the firespray is preferable for him to accomplish his main task in the fleet (as an obstacle).

These little details are important, I really need that movement to happen in a comfortable sequence and often making the adjustment makes the ships cheaper, allowing me to create more synergy and effects in other ships, or adding a whole extra ship into the fleet.

Final Thoughts
List building is actually more complicated than the game itself when it comes to Star Wars X-Wing, in fact I would say most people lose games more often because of bad list building than they do because of how they actually play. This can be frustrating for new players, but if you really consider the types of lists you will be playing against, and have a strategy or method if you will for building lists that works for your style of play, you will eventually find that you can build a wide variety of effect lists with a wide range of ships.

Paul Reavers B-Wings where outgunned and out numbered, but yielded him the victory.  It wasn't the list, but the player's skill that played the biggest part of this win.  You have to make your own lists and learn to play them, the list alone will not be enough.
World Champion Paul Reavers B-Wings where outgunned and out numbered, but yielded him the victory. It wasn’t the list, but the player’s skill that played the biggest part of this win. You have to make your own lists and learn to play them, the list alone will not be enough.

In fact, my personal strategy of choosing a single ship to represent the core strategy of a list is a very effective method for me and I think can be for pretty much anyone. It gives you a solid start and foundation for creating a list, and makes building the rest of it more natural and almost obvious.

It’s important to get good at list building but I think it’s a bad habit to copy other lists. This is still a skill based game and simply taking a championship list is not going to be sufficient to help you win because it’s understanding and knowledge of how to run that list that makes a difference. Its far better to create lists that feels natural for your play style.

What Makes It Tick: Star Wars X-Wing Part III

In this What Makes It Tick series on Star Wars X-Wing we have so far covered the absolute most basic elements of the game, but one of the questions that gets asked frequently in a collectable game like Star Wars X-Wing is “What Should I Buy First?” Or “What Order Should I Buy Things In”? So in this article I’m briefly going to talk about how to approach your collection and how to get the most bang for your buck.

We all live on a budget, this is the reality of life and so going out and spending a couple of thousand dollars on a massive X-Wing collection while a very attractive idea (aside from spending money of course) is outside of the realm of reality for most of us.

When approaching the game I think you really have to cater to both your budget and some basic aesthetic preferences. We could talk about the viability of Rebels vs. Imperials, and how that balances out and whether one is better than the other, but it’s a circular argument at best and one that probably would not get you any closer to deciding what you want to do. In the end, my recommendation is that you actually collect both Rebels and Imperials simultaneously. The reason is simple, understanding both sides is the only way to really understand the game fully and you can only reach that understanding by playing them both.

Each time you face an opponent running a list with ships that you only understand from reading about them rather than having played with them puts you at a major disadvantage, in particular early on when your just getting started. To really be on a level playing field in a match you need to have personal experience with the ships your flying against as well as the ones your actually flying.

The Core Set
The rule of thumb I think is to begin with two core sets and play plenty of lower point matches (75 points) with just X-Wings and Tie-Fighters, even going so far as practicing in solo games. This will help you get the rules of the game down and understand the two most fundamental and widely used ships in the game. X-Wings and Tie Fighters no matter what new things are released are always a solid staple of any list. These are the most stable and bang for your buck ships, you can never go wrong with putting either into a list.

Two core sets however is insufficient to really build a full 100 point list for either side. So you will need to supplement and again I suggest sticking with the core ships. I suggest your first expansion purchases to be 2 Tie Fighter expansions and 1 X-Wing expansion. This will allow you to create two very strong lists (and variations on that those two lists), one for the rebels and one for the Imperials. You will end up with 6 Tie Fighters and 3 X-Wings both of which make solid 100 point lists.

It's a nice idea, but it's not going to be cheap.
It’s a nice idea, but it’s not going to be cheap.

The First Round Of Expansions
Imperials collection tend to be more expensive to expand because you typically end up with more ships in any given list. There are however a couple of staples you can safely buy with confidence. Imperials list however tend to have less synergy than Rebel lists, so there is a measure of flexibility there.

Interceptors should be at the top of that list. They are one of the best ships in the game for Imperials, fast, maneuverable and while slightly more advanced to fly come with some very potent pilot powers. They will really introduce the fine art of movement far better than Tie Fighters and teach you more advanced tactics like flanking, using boosts and how to be effective at different ranges. More to the point however they complement Tie Fighter lists very well. I suggest buying them in pairs, you aren’t likely ever going to need more than 4, so buy 2 interceptor expansions initially and then pick up the Imperial Aces pack for the additional 2 interceptors. It’s not vital to get 4 right away, but getting the first two I would consider a necessary next step.

For the Rebels, you will tend to buy fewer ships and you will find when building lists you tend to build ships that work off each other rather than simply adding ships for individual solo powers.
Two me the two ships you absolutely need is 1 A Wing and 1 E-Wing. The most frustrating element of facing Imperial lists as a rebel is the speed and maneuverability of those lists and while Rebels are known more for their firepower and defense, the A-Wing and E-Wing are answers to the Interceptor and really good ones. You are unlikely to ever need more than one E-Wing but if you end up liking the A-Wings speed and maneuverability, rather than picking up a second A-Wing pick up the Rebel Aces pack to get that second A-Wing, which will simultaneously earn you a B-Wing (we’ll talk about that later). X, A and E wings combo really well, offer a wide range of strategies and are fun as hell to play.

Ships that can wait
For the Imperials the Tie Advanced while a great ship, requires considerable skill and is typically put in very unique higher challenge lists. It’s a ship you can buy when finances allow, but it doesn’t need to be a priority. Tie-Bombers fall into the same category, typically if you add a Tie-Bomber to the list, you’re going to end up creating a Tie-Bomber driven list, hence need more than one so they can wait for when you get more into the game and are ready to try out some new ships.

These are great ships from Wave 3, but they do come with an added learning curve so pace yourself.

For the Rebels I would say the Y-Wing can wait as well as added B-Wings (you might already have one from the rebel aces pack). Again, they are a bit more difficult to use and complicate list building a great deal. The Hwk-290 falls into the same category, but the nice thing about the Hwk-290 is that you really aren’t likely to ever get more than one and it’s a fantastic support ship with a wide range of rolls it can play in your list, if you can afford it I would get this one first as it will introduce all sorts of new list potential.

Big Ships
I think without question the Falcon and Slave I should make your list as soon as you get the opportunity, though I would consider the Slave I a bigger priority than a Falcon. This is less about you getting the opportunity to use them in lists (though they are lots of fun), but more about the fact that opponents are very likely to field these regularly and they are tricky to deal with, so you need that experience to face them with confidence.

It's always tempting to get the latest and greatest, but these ships are quite advanced in terms of play style, again, pace yourself.  Learn the basics first.
It’s always tempting to get the latest and greatest, but these ships are quite advanced in terms of play style, again, pace yourself. Learn the basics first.

Adding big ships to your collection will reveal a whole new level of complexity to the game though, maneuvering larger ships and fitting them into lists requires a deeper understanding of the game and can be overwhelming if you do it too early. Everyone is eager to drop one on the table, but be smart and learn the core game with the smaller ships before you test the waters with these guys. The Lamda Shuttle falls into this category as well, though I consider this ship more a luxury than a necessity for the Imperials. Difficult to maneuver and very specialized this ship can be a big point sink without much pay out unless you really know what you’re doing.

The New Stuff
There is a lot of new stuff and it just keeps coming, as a player entering the game at this point you are going to likely see ships on lists with effects and tricks that will make it difficult to keep up with.

For the Imperials the two really influential ships that you will see hitting the table more and more these days are the Tie-Defender and the Tie-Phantom. Both of these ships really change things in terms of list building for the Imperials. In many ways, it allows Imperial players to build list that look more like Rebel lists than Imperial lists with a greater degree of synergy, the use of specialty mechanics like stealth and of course something most Imperial ships don’t have, shields. You also have other large ships like the Lamnda Shuttle that adds a lot of utility and the new Decimator which is basically floating firepower. All of these ships have added a whole new meta level to the game making it more complex, but simultaneously (in my humble opinion) more fun. Given the opportunity though as a new player I would be more focused on the basics than trying to find uses for these more difficult to use ships.

The rebels have ships like the B-Wing, E-Wing and Y-Wing, but these ships don’t really change how the rebel players plays the game, but rather allow them to create lists that focus their synergies on specific strategies, of which there are many, but they don’t really introduce new mechanics. E-wing are very much like interceptors, but considerably better, in fact one could say if built certain ways they are even more maneuverable. The big new addition to watch out for is the YT-2400, this ship has the best of all worlds, maneuverable, lots of firepower, good defense. It’s just all around a really good ship and incredibly flexible for list building. You also have the Z wing, which is kind of an oddity in the set, though it’s worth saying some world champion players use them for their list so they are not to be ignored. They are cheap ships for the Rebels, though not really an answer to Tie-Fighters, think of them as cheap X-Wings. If you’re going to get any, get at least 3 or 4, it’s typically not worth having only 1 or 2 in a list.

Finally there is a whole new faction and this will once again change a great deal in the game. The new faction is definitively not a good place to start, it’s the latest and greatest and as such assumes a lot about the skill level of the players picking them up.

Going Beyond The Basics
I think when you get to a point where you have a base collection going, you will get to a point where you start to connect the dots and what ships can do and what ships you want to buy is going to become second nature. I personally love ships like the B-Wing and A-Wing on the rebel side and on the Imperial side I’m partial to fielding the Tie-Defender as a staple ship for any sort of list I’m building. You will develop preferences like that over time as you gain experience. The thing to keep in mind is how many of any given ship you need. The point cost of ships typically dictates this and while you will see lists that break the sort of presumed standard like for example I don’t think there is any reason to have two falcons, but in fact duel falcons is not an entirely uncommon list to field. Suffice to say you never need more copies of a ship than points would allow, so there is no point in having 9 Tie-Fighters since you will only at absolute maximum field 8 and at that level you’re not making any choices, your effectively buying 8 Tie’s to field a very specific list. To me this is not really worth doing. For example with Tie Fighters, the 6 you end up with initially is actually enough, you’re not likely to field lists with more than that and even if you did you would know that only from experience of first learning to fly with 6.

Just keep point cost in mind when expanding your list.

In terms of needs and flexibility a staple a rebel collection might look like this.

2 A Wings – Priority
2 B Wings
1 E Wing – Priority
2 Y Wings
1 Falcon
3 X wings – Priority
1 Hwk-390
3-4 Z Wings (very optional)

For the Imperials a staple list might look like this.

6 Tie Fighters – Priority
4 Interceptors – Priority
3 Tie Bombers
1 Slave I – Priority
1 Lambda Shuttle
1 Defender
1 Phantom
1 Tie Advanced

Another thing I would suggest is that you continue a duel collection. It’s really a big advantage to have for the purposes of understanding the game and when you run a across a list that gives you problems you can examine it and run tests against it until you understand how to best deal with such a list.

Adding a third faction to the game is going to change things quite dramatically, but that doesn't mean you need to rush out and be the first one to buy them.  One can assume this faction has veteran players in mind.
Adding a third faction to the game is going to change things quite dramatically, but that doesn’t mean you need to rush out and be the first one to buy them. One can assume this faction has veteran players in mind.

I hope that was helpful advice for new comers, I’m certain there are going to be differences of opinion from experience players but to me the staple of the game, the foundation for learning to play it well is to field simple and efficient lists. The base way to learn that is to start with X-Wing and Tie-Fighters, fly them often until the game’s nuances become second nature. Learning how to fly other ships after that becomes much more natural and far easier, as those making hard decisions about what ships to expand your collection with.

What Makes It Tick: Star Wars X-Wing – Part II

Continuing on the basics of Star Wars X-Wing miniatures game, I thought I would focus this time on the intricacies of the combat mechanic, another thing I look back on my experience and say to myself, god I wish I knew that from day one.

The Dice
The X-Wing combat dice, red for attacks, green for defense, are no equal! Most gamers won’t spend too much time analyzing the dice of a game, but in the case of X-Wing it plays a pivotal, quite possibly the single most important piece of the puzzle in understanding what is and isn’t an advantage.

dice

To put it in plain terms, if you have a ship with 3 attack dice, rolling against a ship with 3 defense dice, the defender is at a disadvantage. The reason is that by default 50% (2 hits and 2 crits) of the results on an attack die are hits, while only 37% (3 evades) of the results on a defense die are evades.

Duh! This is not everything there is to the puzzle. Going deeper into the mechanic you will note that most ships have the options of either evading, or focusing, which again, changes the odds, given things are equal (the same amount of dice) but the odds are still in the attackers favor. This is because an attack die with a focus token has 2 focus faces, so if you do the math, with 4 hits and 2 focuses on an 8 side, this means with focus you have a 75% chance of hitting.

The defense die however with a focus gets you to 66% (3 evades and 2 focuses faces on an 8 sided die). The advantage remains on the attack.

Now there is the evade action which effectively gives you 1 free success you can spend against one attack roll after you see the dice results. This however again, given things are equal (3 dice each) and assuming the attacker takes a focus while the defender takes an evade still leaves the attack at a slight advantage. In that, the attack also all but guaranteed to have at least 1 hit, so with the remaining two dice he has about an equal chance of getting as many hits as the defender can roll with 3 defense die at 37% percent.

I’m not going to get too deep into the statistics, but the point here is this. When playing X-Wing, the only good defense is an offense. Think of the green dice as a formality, to win you need to shoot and really what you want to do is shoot first.

Pilot Skill and Combat
This is where pilot skill really comes in. While movement takes place from lowest to highest skill which gives a small benefit to low skill pilots as they can effectively get in people’s way and cause overlaps, having a high pilot skill is everything because you shoot first.

3iIxRAs

Imagine a simple scenario. You have a low pilot skill X-Wing vs. a High Pilot X-Wing and let’s assume they are stationary. Since they are equal ships, simply facing each other, who will win? The player with the higher skill. The reason is that, shooting first will most likely result in a final round in which the higher pilot skill X-Wing will shoot and blow up the lower ship X-Wing before he gets a chance to shoot. Just ask Han Solo!

The final piece, shooting arcs
Since we know that the person shooting is at an advantage and shooting first exponentially increases that advantage, the end result is that the player who keeps his target in his sights and gets the most shots in a match is most likely to win the game. As such maneuverability of the ship and player skill in maneuvering his ships becomes really the defining final piece of the puzzle. Each piece is important, but only when they all come together is victory assured.

Conclusion
Combat in Star War X-Wing is a combination of working the statistical of the dice, really understanding what it means to roll X attack dice vs. Y defense dice. It comes down to pilot skill, a choice you make when you’re building your list. Finally maneuverability combined with smart player choices (player skill). For a novice player that is a lot to juggle at once, so where do you start?

The answer is you start with the things you can control.

We can control our understanding of the attack dice vs. the defense dice. Simply knowing that when you charging a Millennium Falcon and are about to roll an attack with 4 attack dice against his 1 defense dice that not only are you at a major advantage but likely to get 2-3 hit minimum will give you the confidence to make such a charge. You can almost ignore defense dice to a degree, they are statistically likely to fail their owner. So be aggressive, shoot, shoot and shoot.

You can control the pilot skill of the ships you field. It’s tempting to take low pilot skill pilots because they are cheap point wise and allow you to field more ships, but the reality is that you are far better off with 3 X-Wings with high pilot skill pilots in the cockpit than you are with 4 low pilot skill X-Wings. Rolling 9 dice and shooting first, is far better than rolling 12 dice and shooting last because you are likely to lose a ship before it gets too shoot, so you’ll be rolling 9 dice anyway.

Finally maneuverability, now this one is tougher to control and really tougher to make a determination. What is maneuverable, what are we comparing it to. Clearly Tie Fighters are more maneuverable than X-Wings, but when it comes to maneuverability typically this means having the ability to keep ships in your firing arc by making tight turns, doing 180’s and keeping your ship in a position to fire. With X-Wings you have maneuvers like the 180 degree turn, you have sharp turns. It’s a maneuverable ship for all intense and purposes. Not as maneuverable as some other ships, but more than sufficient to keep ships in your firing arc. Avoid slower, hard to maneuver ships when you first start playing X-Wing, get familiar with the X-Wings, A-Wings, Tie Fighters and Tie Interceptors first and avoid large ships like the falcon or Lambda shuttle until your more comfortable with the games nuances.

Now certainly there is a lot more to the game here, there are all sorts of ships and list with different variances and effects that can render some or all of these things like firepower and maneuverably useless, but again, we are talking about a starting strategy here. Something to base your starting plays at and giving yourself a fighting chance. As such, understand some of this information and apply it. Over time lights will start to turn on and you will gain the confidence needed to consider deeper levels of play.

I can tell you that when facing 3 X-Wings with high pilot skills and special effects, it doesn’t matter if you’re a new player or a veteran, that list is always strong and it is so because it filters through the most fundamental core elements of the game. It’s safe pick and you will win matches, in particular when facing opponents working without the basic information outlined in this article.